
Quick how-to guide to using Salesforce Inspector
In a previous post, I had introduced a favorite tool of mine called Salesforce Inspector. In this post, I’d like to dig into this tool a little deeper. I will share some of the specific ways it’s helped me save time (and hopefully will help you too!)
Grabbing info about the current record
Have you been in a situation when you were building out an automation which involved updating a field on a record, but the field wasn’t placed on the page layout? Then, when you need to test if the automation is working or not, you have to:
- Add it back to the layout
- Hope it doesn’t throw any users off
- Remove it after you’re done testing (I’m not even going to get into the report/workbench/dataloader options for this one)
No more!
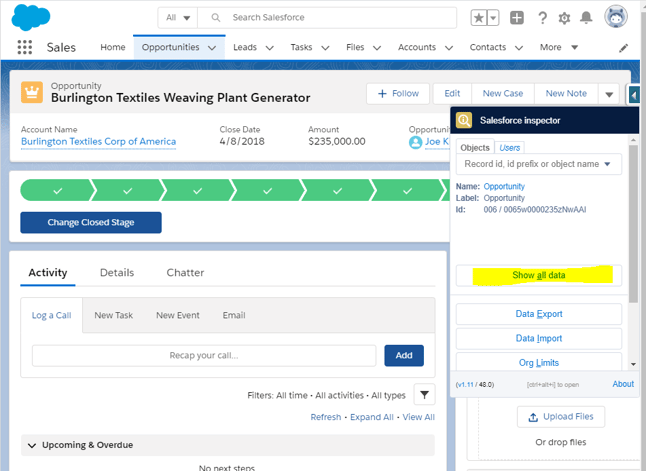
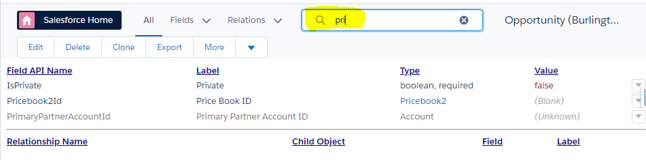
With this tool, there’s always a little tab on the side of your screen that you can click, and then (while having a record open on your page), just click the “Show all data” button. Now you have all the fields on this object listed out, with the values that this record has, right at your fingertips. There’s even a handy-dandy filter bar at the top to quickly search for the needed field. Again, you can do this with many other tools, but it takes 2 clicks – one on the tab, one on “Show all data” and you have all the record’s information. No need to disturb anything, open up other apps or build a new report (or search for, open, and adjust an existing one).
Pulling down data from multiple records
So, this is where things start getting really interesting. At a very basic level the data export feature helps me avoid having to create custom report types and build out reports that I will only use once for whatever specific set of records I’m trying to retrieve and get information on. As a new admin, I’ll be the first to admit I was intimidated by workbench and soql. Spell one thing incorrectly, use the wrong type of quote mark, use the label instead of the API name and you get error messages. Loads of error messages.
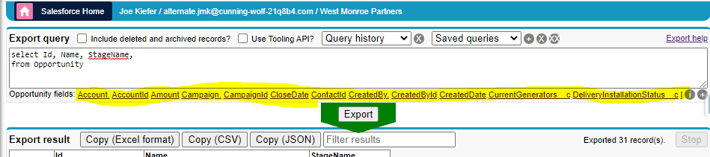
Coming back to this tool, again, we start off with 2 clicks. One on the tab, one on the “data export” button. No separate windows/tabs, no additional logins, just 2 clicks. And my favorite part – the help! When you’re “select” – ing (select being the SOQL term for which fields to show) the fields you want, there’s a bar that runs below the entry window showing all the fields on the Object you named in the “from” clause. Just point, click and add the fields with little worry of misspelling (just remember to remove the comma after the last one).
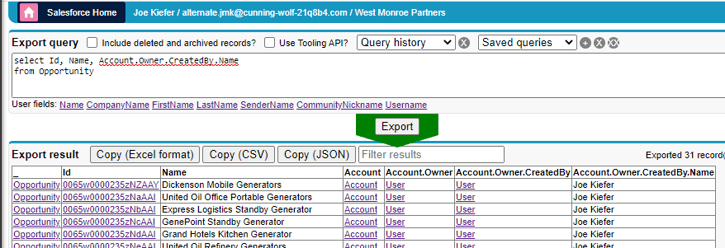
And to kick it up another notch from there – to provide utility that you are genuinely unable to get through custom reporting – you can tunnel through lookup fields to get data from several tiers of related records! See the example below, which shows opportunities, and then tunnels through to show the name of the person that created the owner of the account that the opportunity is under! WOW!
More benefits
In addition to the benefits above, there’s both a filter window as well as the standard SOQL functionality of the “where” clause to narrow down the results (you can drill down into the “where” clause as well, which I’ve found incredibly useful – for example, to find all opportunities where the manager of the sales user is a particular person).
Goodbye, dataloader!
Once again, I’ll ask if you’d rather use an external tool, that forces you to log in again, and work in a separate window…or if you’d rather just make 2 clicks. The Data Import feature has, for all practical purposes, replaced Data Loader for me. If I were making massive changes (100k records or more) or if I were concerned about a lack of backups/particularly sensitive information, I might consider using the officially endorsed Dataloader to protect myself, but for 90% of what I would otherwise use dataloader for (things like changing the salesperson on a group of opportunities, or the manager of a group of employees, etc.) this is quicker, easier, and just better integrated. It offers the expected insert/update/upsert/delete options that come with Dataloader, and lets you use data in either csv or excel format!
An example use case of Salesforce Inspector
Let’s take a quick look at the example above – a manager has left the company, and their replacement has come in and needs to be made the manager of all the previous manager’s reports.
Without Inspector
Without the tool, I’d go into the reports tab, create a new report, select the users report type, search for and drag in the appropriate fields, then export the data to a csv. Open the csv in excel, manipulate the data to change the “manager” field to the new manager, and save it as a csv. Open dataloader, log in, select update records, upload the csv, map the fields, and finally update. That’s a lot of different tools to navigate through!
With Inspector
Now, instead, I click twice (once on the tab, once on data export), start typing “user” into the “from” line and click on it as soon as it pops up in the quick-fill bar below. Then I do the same for the fields I need the info from, and can copy it in Excel format and paste it right into an open Excel doc. Once I update the manager field, I just copy the data, then 2 click my way into the data import feature, select update, right click and paste the data into the window, verify the data as it automatically displays and click import. Done.
With one click I can even copy the fail/success details and paste them into Excel in the format I’d like. I’m a much bigger fan of grouping these logs into separate tabs of one spreadsheet than keeping lots of spreadsheets for one deployment, but to each their own.
Show and Tell Salesforce Style
I hope this blog helps you – when I first installed Salesforce Inspector I had it sitting in my browser for months before really giving it a fair try. It wasn’t until someone showed me how easy this tool is to use that I started using it, and now it’s the most frequently used tool in my arsenal.