\
\ \
\
\\{{Your Name}}\\
\{{Your Title}}\
\O: {{Your Phone}}\
\E: {{Your Email}}\
\\Connect on LinkedIn\\
\
\
\
### Required Replacements
| **Placeholder** | **Replace With** |
| --- | --- |
| {{Company Logo URL}} | Public URL of the company logo |
| {{Your Name}} | Employee name |
| {{Your Title}} | Job title |
| {{Your Phone}} | Phone number |
| {{Your Email}} | Email address |
| {{Your LinkedIn Profile URL}} | LinkedIn profile URL (optional) |
Users can remove any optional lines they don’t want to display.
### Testing Your Signature & Letterhead Together
After saving your signature:
1. Open a record
2. Click***Send Email***
3. Insert an ***Enhanced** **Letterhead***
4. Verify the signature appears automatically
5. Send a test email to yourself
6. Confirm the logo, formatting, and hyperlinks render correctly
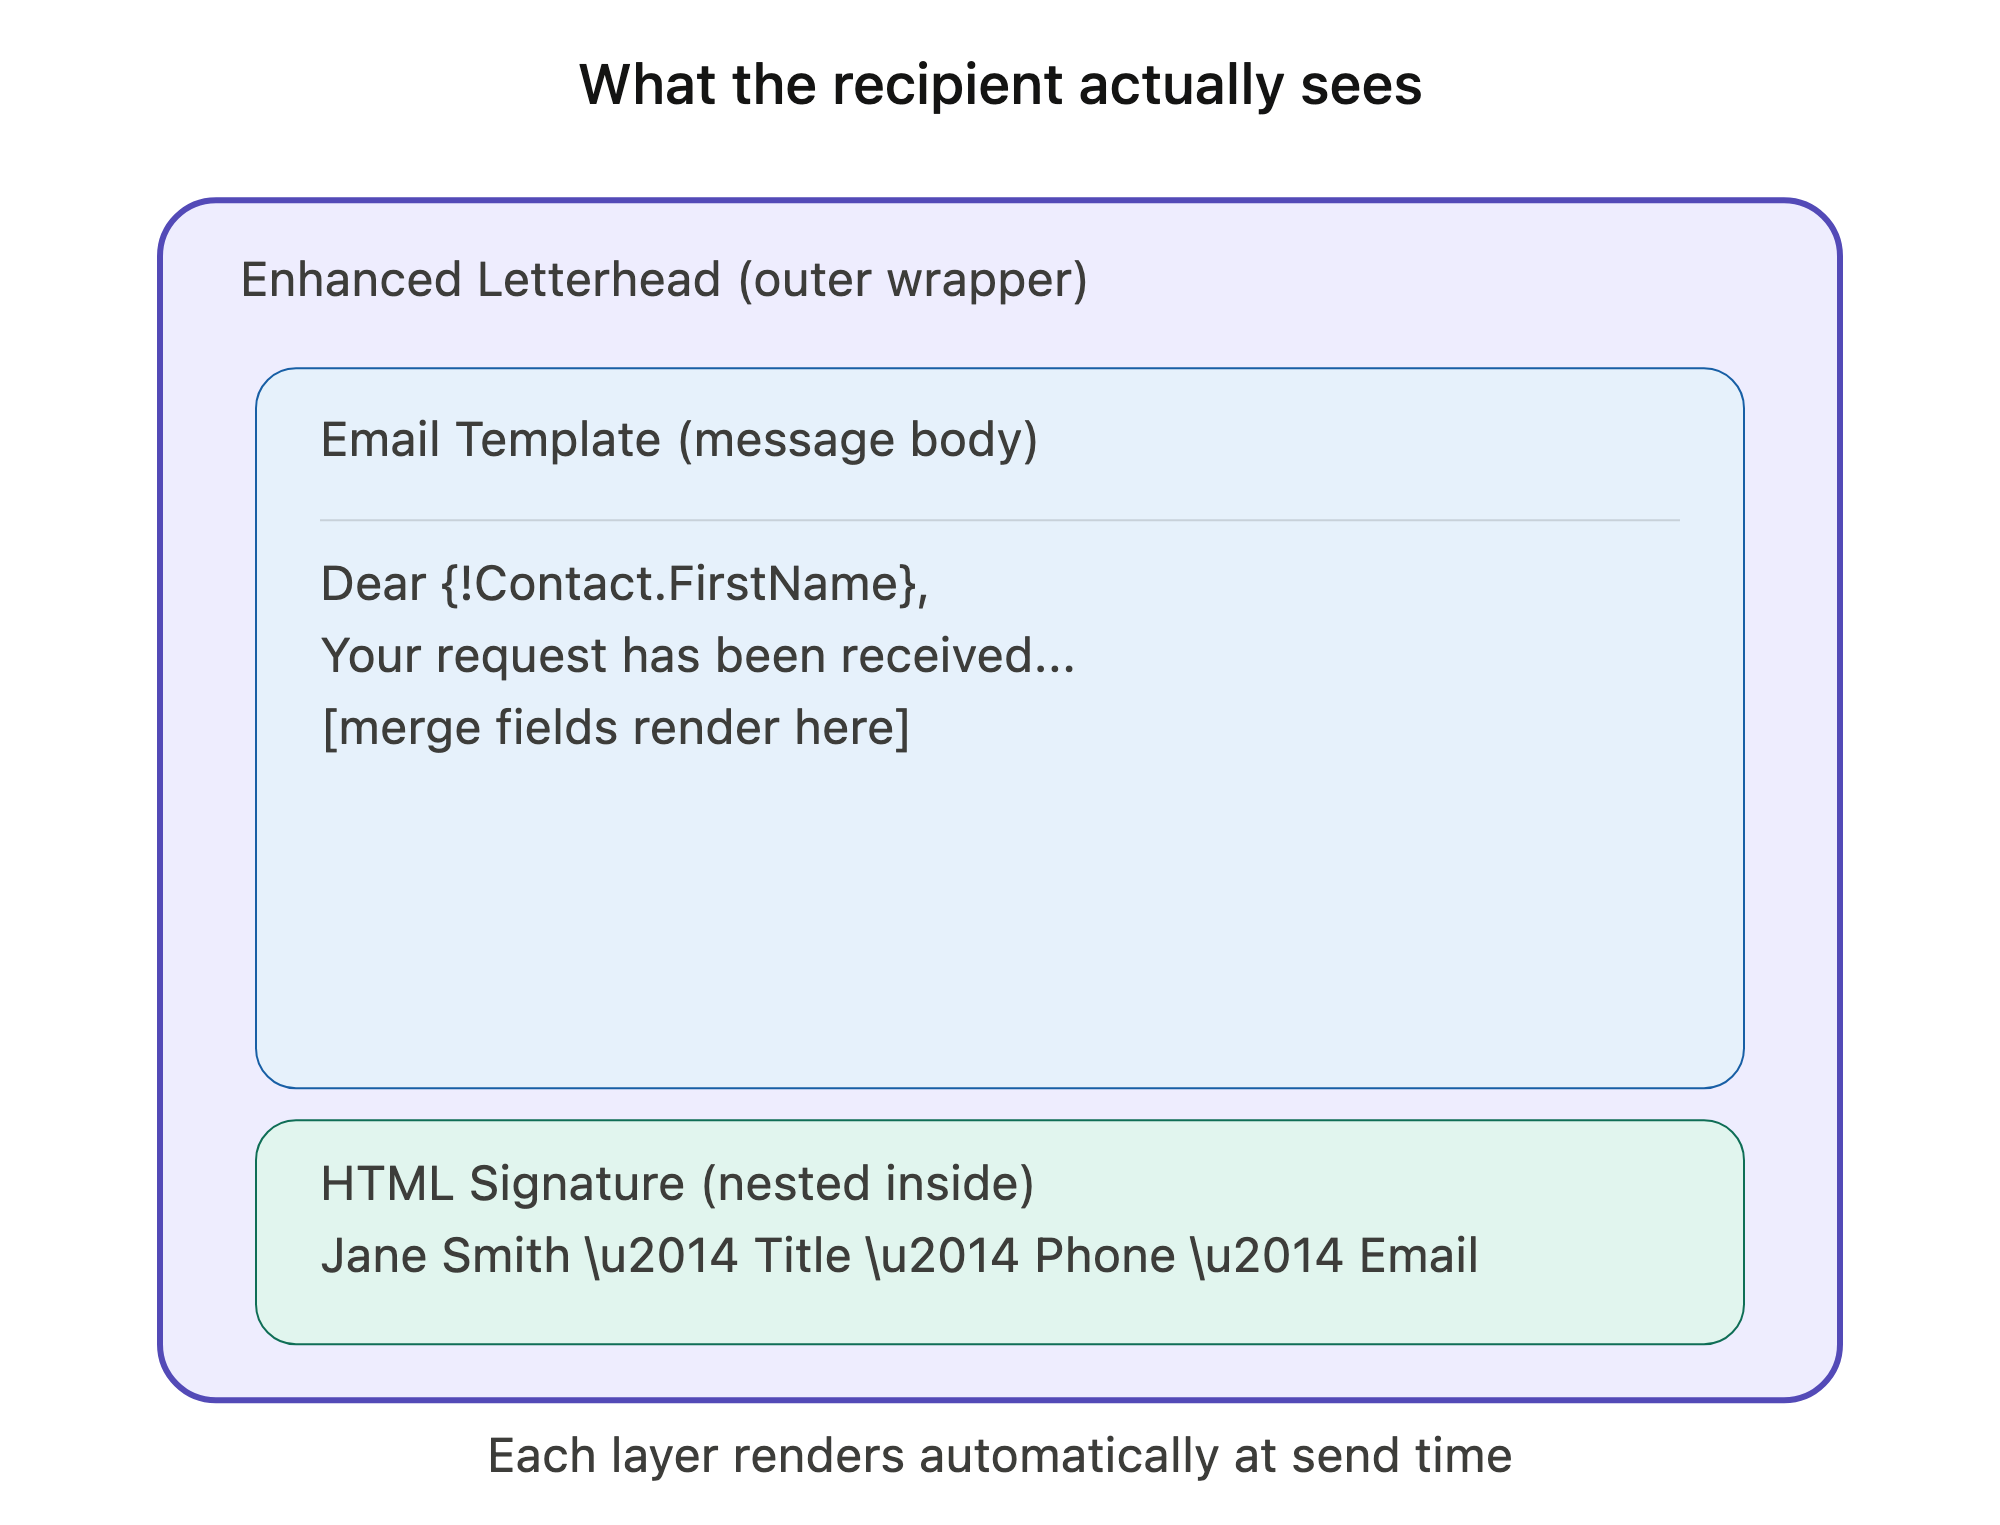
When configured together:
- The Letterhead provides company branding
- The Template provides content
- The Signature provides sender information
For most organizations, the configuration described above is sufficient. In our implementation, additional automation is used to standardize signature formatting and store the resulting HTML for use across Salesforce.
## Part 4: Signature Automation
The signature solution described in Part 3 includes automation that converts user-maintained signature content into reusable HTML. This allows users to manage signatures through standard Salesforce settings while maintaining consistent formatting across the organization.
Rather than storing user-entered HTML directly in outbound emails, a Flow and Apex action work together to convert and store the signature in a format that can be reused consistently across the organization.
### Supporting Components
### Custom User Field
A custom field on the User object stores the converted HTML signature.
| Field Label | API Name | Data Type |
| --- | --- | --- |
| HTML Signature | HTML\_Signature\_\_c | Rich Text Area (32,768) |
### Apex Invocable Action
The automation leverages a custom Apex Invocable Action.
| **Component** | **Purpose** |
| --- | --- |
| **ConvertEmailSignatureToRichTextInvocable** | Converts user-maintained signature content into rich HTML for email consumption |
### How it Works
When a user updates their signature:
1. The User record is updated
2. A ***record-triggered Flow*** detects that the Signature field has changed
3. The Flow calls the ***ConvertEmailSignatureToRichTextInvocable*** Apex action
4. The Apex action converts the signature into rich HTML
5. The resulting HTML is stored in ***HTML\_Signature\_\_c***
6. Email functionality references the HTML Signature field when generating outbound communications
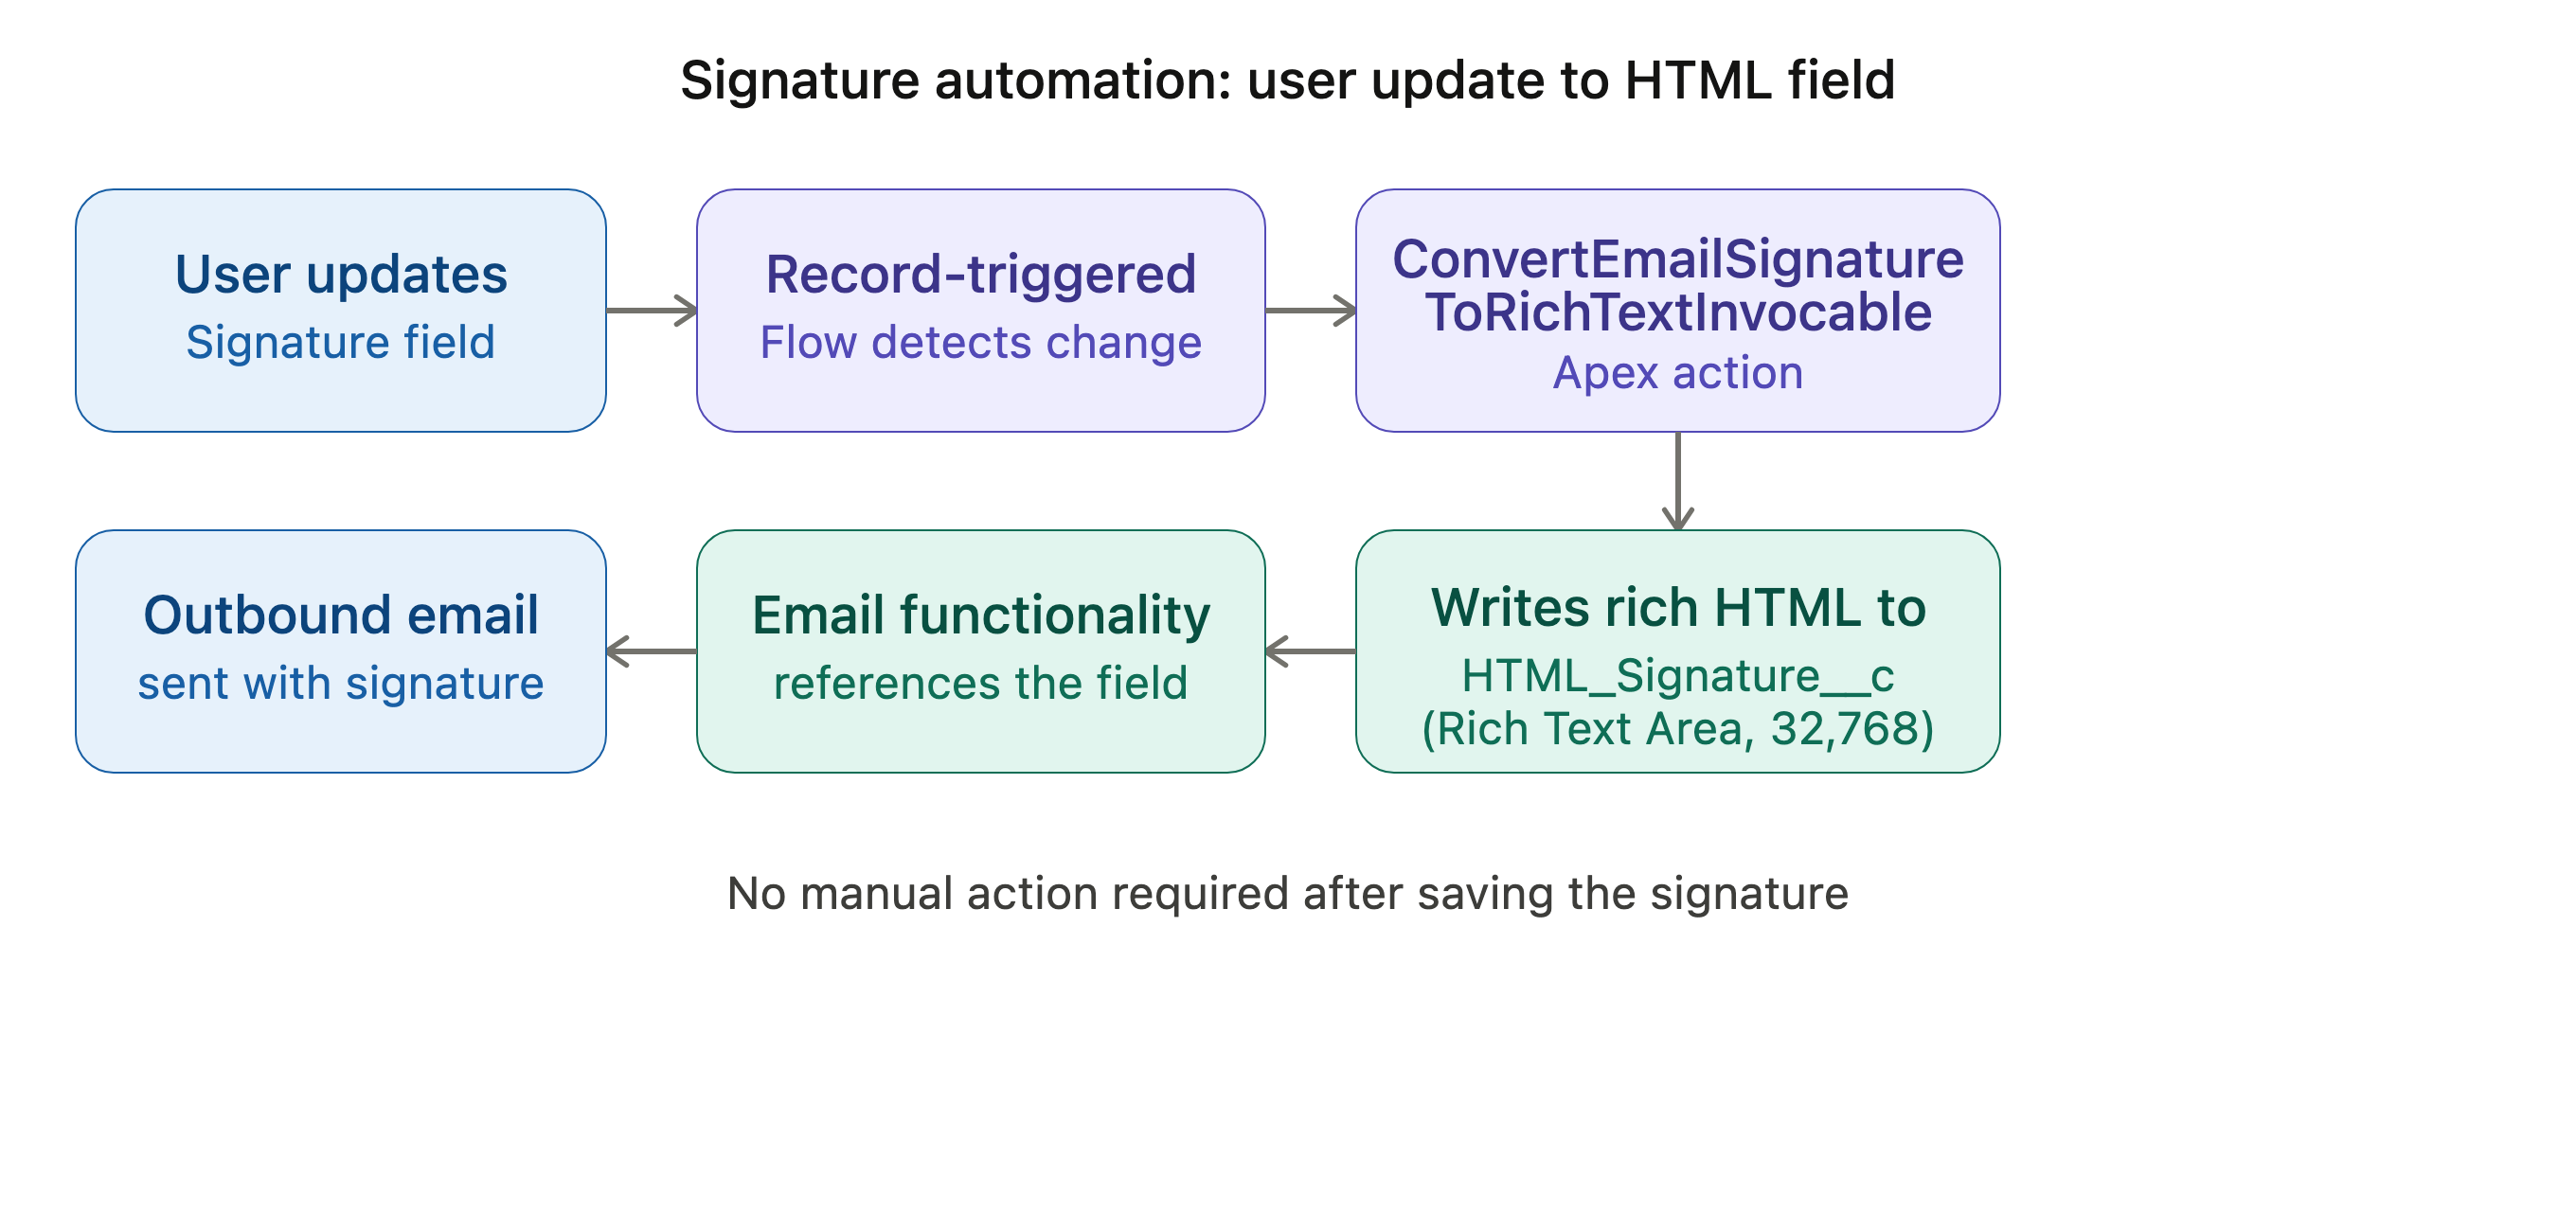This architecture allows users to manage signatures through standard Salesforce settings while ensuring consistent formatting across the organization. With Letterheads, Templates, Flow branding, and Signature Automation in place, Salesforce can provide a consistent and professional email experience across both user-generated and automated communications.
Before wrapping up, here's a quick reference guide for the most common branding-related configurations discussed throughout this article.
Quick Reference Summary
Use the table below when configuring or troubleshooting email branding.
| **Topic** | **Key Navigation Path** | **Critical Notes** |
| --- | --- | --- |
| Enhanced Letterhead (use) | Insert in email compose modal | Wraps message with org branding |
| Enhanced Letterhead (admin setup) | Setup → Email → Enhanced Letterheads | Verify exact path for your org/release |
| HTML Signature (edit) | Settings → Email → My Email Settings | Paste HTML directly; delete unused placeholder lines |
| Signature → HTML conversion | Automated via Flow on User object | Record-triggered Flow + Apex action writes to a custom field |
| Flow Email Header Image | Classic: upload doc → Copy Image Address → Flow text variable | Externally Available Image = true; Rich Text Formatted Body = true |
### Recommended Configuration Order
For a new Salesforce implementation, consider configuring email features in this order:
1. Configure***Email Deliverability***
2. Configure***SPF***
3. Configure***DKIM***
4. Validate ***email authentication***
5. Create ***Enhanced Letterheads***
6. Create***Email Templates***
7. Configure ***Flow email branding***
8. Configure***HTML Signatures***
9. Test across Outlook, Gmail, and mobile devices
Following this sequence helps surface issues early and avoids troubleshooting multiple variables at once.
The first four steps are covered in the companion guide, [Setting Up Email Deliverability in Salesforce](https://blog.teamascend.com/blog/how-to-set-up-email-deliverability-in-salesforce), which focuses on email authentication and deliverability. This guide covers the remaining steps required to create a professional and consistent email experience for your users and customers.
## Final Thoughts
Strong email branding isn't just about aesthetics.
A well-designed email framework improves consistency, reduces maintenance, and helps ensure every email sent from Salesforce reflects your organization's standards. The key is understanding which tools apply to which email experiences:
- Enhanced Letterheads provide branding for user-generated emails
- Email Templates provide reusable content and merge fields
- Salesforce-hosted images provide branding for Flow-generated emails
- HTML Signatures personalize communications for individual users
- Automation helps maintain consistency behind the scenes
Taken together, these components create a scalable and maintainable email experience that works across both user-generated and automated communications. Even though this guide focuses on branding, many email issues originate in the authentication layer. When troubleshooting, start with the fundamentals and work outward:
Deliverability → Authentication → Branding
Whether an email is sent by a user, a template, or a Flow, your recipients should receive a consistent and professional experience every time.
The goal isn't simply to send emails—it's to ensure every email reinforces your organization's brand and delivers a polished experience to the recipient.
## Frequently Asked Questions (FAQs)
### Why can't I use an Enhanced Letterhead in a Salesforce Flow email?
Flow Email Actions don't support Enhanced Letterheads. To brand Flow-generated emails, you need to host an image in Salesforce (as a Document with "Externally Available Image" enabled), reference its URL in a Flow text variable, and embed that variable in an \ tag with Rich Text Formatted Body set to true.
### What's the difference between an Enhanced Letterhead and an Email Template in Salesforce?
An Enhanced Letterhead controls the visual design and branding of an email, while an Email Template controls the message content and merge fields. Most organizations use both together (Letterhead for branding, Template for content) alongside an HTML Signature for sender details.
### How do you add a branded header image to a Salesforce Flow email?
Upload the image as a Document in Salesforce Classic with "Externally Available Image" enabled, copy its image address URL, store that URL in a Flow text variable, and reference the variable inside an \ tag at the top of the email body—making sure Rich Text Formatted Body is set to true on the Send Email action.
[](https://cta-redirect.hubspot.com/cta/redirect/2733374/d642d48f-f65a-4c45-aa94-29ec149674d1)
### Table of Contents
#### Get Insights Sent to Your Inbox
## Related Articles

Salesforce, Salesforce Tips and Tricks
### [Cybersecurity Awareness Month 2026: A Checklist for IT Directors Evaluating Their MSP](https://blog.teamascend.com/blog/cybersecurity-awareness-month-checklist-it-directors)
October 06, 2026
[Read Now .svg)](https://blog.teamascend.com/blog/cybersecurity-awareness-month-checklist-it-directors)

Salesforce, Salesforce Tips and Tricks
### [How to Evaluate an AI Vendor for a Regulated Environment (and Operationalize Governed AI)](https://blog.teamascend.com/blog/evaluate-ai-vendor-regulated-environment)
October 01, 2026
[Read Now .svg)](https://blog.teamascend.com/blog/evaluate-ai-vendor-regulated-environment)

Salesforce, Salesforce Tips and Tricks
### [How to Increase Salesforce Adoption (Without Bribing Users With Gift Cards)](https://blog.teamascend.com/blog/how-to-increase-salesforce-adoption-without-bribing-users-with-gift-cards)
September 29, 2026
[Read Now .svg)](https://blog.teamascend.com/blog/how-to-increase-salesforce-adoption-without-bribing-users-with-gift-cards)
[](https://teamascend.com/)
Contact
833-639-2285
-
-
-
-
-
- Company
- [About](https://teamascend.com/about/)
- [Services](https://teamascend.com/services/)
- [Testimonials](https://teamascend.com/client-success-stories/)
- [Partner With Us](https://teamascend.com/about/partner-with-us/)
- [Resources](https://teamascend.com/resources/)
- [Contact](https://teamascend.com/contact/)
- [Careers](https://teamascend.com/careers/)
- Services
- [IT Consulting](https://teamascend.com/services/strategic-consulting/)
- [Cybersecurity](https://teamascend.com/services/cybersecurity/)
- [IT Infrastructure](https://teamascend.com/services/infrastructure/)
- [Cloud](https://teamascend.com/services/cloud-computing/)
- [24/7 Support Desk](https://teamascend.com/services/infrastructure/support-desk/)
- [Microsoft Services](https://teamascend.com/services/microsoft-365/)
- [Salesforce Services](https://teamascend.com/salesforce-services/)
- [HubSpot Services](https://teamascend.com/services/hubspot-services/)
- [App Development](https://teamascend.com/services/application-development/)
### Empowering Technology. Powered by People.
Technology is critical to businesses across all industries. Today's technology must be smart, reliable, adaptable, and secure. At Ascend Technologies, we deliver solutions at the highest level, from cloud computing to proactive cybersecurity strategies to Salesforce excellence. And the team? As impressive as the tech. Our practical support is focused on one thing: your success. Let's see what we can do together.
[Contact Us](https://teamascend.com/contact/)
©2026 Ascend Technologies, LLC, All Rights Reserved | [Privacy Policy](https://teamascend.com/privacy-policy/)
```json
{
"@context" : "https://schema.org",
"@type" : "WebPage",
"breadcrumb" : {
"@type" : "BreadcrumbList",
"itemListElement" : [ {
"@type" : "ListItem",
"item" : "https://blog.teamascend.com",
"name" : "Home",
"position" : 1
} ]
},
"dateModified" : "2026-07-22T13🇲🇲49",
"description" : "How do you create branded emails in Salesforce? This guide covers Enhanced Letterheads, Flow-generated email branding, and HTML signature setup for admins.",
"name" : "How to Create a Branded Email Experience in Salesforce",
"primaryImageOfPage" : {
"@type" : "ImageObject",
"url" : "https://content.teamascend.com/hubfs/AdobeStock_1912479380.jpeg"
},
"publisher" : {
"@type" : "Organization",
"logo" : {
"@type" : "ImageObject",
"url" : "https://content.teamascend.com/hubfs/Ascend-Technologies-HubSpot-Logo.png"
},
"name" : "Ascend Technologies",
"url" : "https://blog.teamascend.com"
},
"url" : "https://blog.teamascend.com/blog/how-to-create-a-branded-email-experience-in-salesforce"
}
```
\
\
\\{{Your Name}}\\
\{{Your Title}}\
\O: {{Your Phone}}\
\E: {{Your Email}}\
\\Connect on LinkedIn\\
\
\
\
### Required Replacements
| **Placeholder** | **Replace With** |
| --- | --- |
| {{Company Logo URL}} | Public URL of the company logo |
| {{Your Name}} | Employee name |
| {{Your Title}} | Job title |
| {{Your Phone}} | Phone number |
| {{Your Email}} | Email address |
| {{Your LinkedIn Profile URL}} | LinkedIn profile URL (optional) |
Users can remove any optional lines they don’t want to display.
### Testing Your Signature & Letterhead Together
After saving your signature:
1. Open a record
2. Click***Send Email***
3. Insert an ***Enhanced** **Letterhead***
4. Verify the signature appears automatically
5. Send a test email to yourself
6. Confirm the logo, formatting, and hyperlinks render correctly

When configured together:
- The Letterhead provides company branding
- The Template provides content
- The Signature provides sender information
For most organizations, the configuration described above is sufficient. In our implementation, additional automation is used to standardize signature formatting and store the resulting HTML for use across Salesforce.
## Part 4: Signature Automation
The signature solution described in Part 3 includes automation that converts user-maintained signature content into reusable HTML. This allows users to manage signatures through standard Salesforce settings while maintaining consistent formatting across the organization.
Rather than storing user-entered HTML directly in outbound emails, a Flow and Apex action work together to convert and store the signature in a format that can be reused consistently across the organization.
### Supporting Components
### Custom User Field
A custom field on the User object stores the converted HTML signature.
| Field Label | API Name | Data Type |
| --- | --- | --- |
| HTML Signature | HTML\_Signature\_\_c | Rich Text Area (32,768) |
### Apex Invocable Action
The automation leverages a custom Apex Invocable Action.
| **Component** | **Purpose** |
| --- | --- |
| **ConvertEmailSignatureToRichTextInvocable** | Converts user-maintained signature content into rich HTML for email consumption |
### How it Works
When a user updates their signature:
1. The User record is updated
2. A ***record-triggered Flow*** detects that the Signature field has changed
3. The Flow calls the ***ConvertEmailSignatureToRichTextInvocable*** Apex action
4. The Apex action converts the signature into rich HTML
5. The resulting HTML is stored in ***HTML\_Signature\_\_c***
6. Email functionality references the HTML Signature field when generating outbound communications
This architecture allows users to manage signatures through standard Salesforce settings while ensuring consistent formatting across the organization. With Letterheads, Templates, Flow branding, and Signature Automation in place, Salesforce can provide a consistent and professional email experience across both user-generated and automated communications.
Before wrapping up, here's a quick reference guide for the most common branding-related configurations discussed throughout this article.
Quick Reference Summary
Use the table below when configuring or troubleshooting email branding.
| **Topic** | **Key Navigation Path** | **Critical Notes** |
| --- | --- | --- |
| Enhanced Letterhead (use) | Insert in email compose modal | Wraps message with org branding |
| Enhanced Letterhead (admin setup) | Setup → Email → Enhanced Letterheads | Verify exact path for your org/release |
| HTML Signature (edit) | Settings → Email → My Email Settings | Paste HTML directly; delete unused placeholder lines |
| Signature → HTML conversion | Automated via Flow on User object | Record-triggered Flow + Apex action writes to a custom field |
| Flow Email Header Image | Classic: upload doc → Copy Image Address → Flow text variable | Externally Available Image = true; Rich Text Formatted Body = true |
### Recommended Configuration Order
For a new Salesforce implementation, consider configuring email features in this order:
1. Configure***Email Deliverability***
2. Configure***SPF***
3. Configure***DKIM***
4. Validate ***email authentication***
5. Create ***Enhanced Letterheads***
6. Create***Email Templates***
7. Configure ***Flow email branding***
8. Configure***HTML Signatures***
9. Test across Outlook, Gmail, and mobile devices
Following this sequence helps surface issues early and avoids troubleshooting multiple variables at once.
The first four steps are covered in the companion guide, [Setting Up Email Deliverability in Salesforce](https://blog.teamascend.com/blog/how-to-set-up-email-deliverability-in-salesforce), which focuses on email authentication and deliverability. This guide covers the remaining steps required to create a professional and consistent email experience for your users and customers.
## Final Thoughts
Strong email branding isn't just about aesthetics.
A well-designed email framework improves consistency, reduces maintenance, and helps ensure every email sent from Salesforce reflects your organization's standards. The key is understanding which tools apply to which email experiences:
- Enhanced Letterheads provide branding for user-generated emails
- Email Templates provide reusable content and merge fields
- Salesforce-hosted images provide branding for Flow-generated emails
- HTML Signatures personalize communications for individual users
- Automation helps maintain consistency behind the scenes
Taken together, these components create a scalable and maintainable email experience that works across both user-generated and automated communications. Even though this guide focuses on branding, many email issues originate in the authentication layer. When troubleshooting, start with the fundamentals and work outward:
Deliverability → Authentication → Branding
Whether an email is sent by a user, a template, or a Flow, your recipients should receive a consistent and professional experience every time.
The goal isn't simply to send emails—it's to ensure every email reinforces your organization's brand and delivers a polished experience to the recipient.

## Frequently Asked Questions (FAQs)
### Why can't I use an Enhanced Letterhead in a Salesforce Flow email?
Flow Email Actions don't support Enhanced Letterheads. To brand Flow-generated emails, you need to host an image in Salesforce (as a Document with "Externally Available Image" enabled), reference its URL in a Flow text variable, and embed that variable in an \ tag with Rich Text Formatted Body set to true.
### What's the difference between an Enhanced Letterhead and an Email Template in Salesforce?
An Enhanced Letterhead controls the visual design and branding of an email, while an Email Template controls the message content and merge fields. Most organizations use both together (Letterhead for branding, Template for content) alongside an HTML Signature for sender details.
### How do you add a branded header image to a Salesforce Flow email?
Upload the image as a Document in Salesforce Classic with "Externally Available Image" enabled, copy its image address URL, store that URL in a Flow text variable, and reference the variable inside an \ tag at the top of the email body—making sure Rich Text Formatted Body is set to true on the Send Email action.
[](https://cta-redirect.hubspot.com/cta/redirect/2733374/d642d48f-f65a-4c45-aa94-29ec149674d1)
### Table of Contents
#### Get Insights Sent to Your Inbox
## Related Articles

Salesforce, Salesforce Tips and Tricks
### [Cybersecurity Awareness Month 2026: A Checklist for IT Directors Evaluating Their MSP](https://blog.teamascend.com/blog/cybersecurity-awareness-month-checklist-it-directors)
October 06, 2026
[Read Now .svg)](https://blog.teamascend.com/blog/cybersecurity-awareness-month-checklist-it-directors)

Salesforce, Salesforce Tips and Tricks
### [How to Evaluate an AI Vendor for a Regulated Environment (and Operationalize Governed AI)](https://blog.teamascend.com/blog/evaluate-ai-vendor-regulated-environment)
October 01, 2026
[Read Now .svg)](https://blog.teamascend.com/blog/evaluate-ai-vendor-regulated-environment)

Salesforce, Salesforce Tips and Tricks
### [How to Increase Salesforce Adoption (Without Bribing Users With Gift Cards)](https://blog.teamascend.com/blog/how-to-increase-salesforce-adoption-without-bribing-users-with-gift-cards)
September 29, 2026
[Read Now .svg)](https://blog.teamascend.com/blog/how-to-increase-salesforce-adoption-without-bribing-users-with-gift-cards)
[](https://teamascend.com/)
Contact
833-639-2285
-
-
-
-
-
- Company
- [About](https://teamascend.com/about/)
- [Services](https://teamascend.com/services/)
- [Testimonials](https://teamascend.com/client-success-stories/)
- [Partner With Us](https://teamascend.com/about/partner-with-us/)
- [Resources](https://teamascend.com/resources/)
- [Contact](https://teamascend.com/contact/)
- [Careers](https://teamascend.com/careers/)
- Services
- [IT Consulting](https://teamascend.com/services/strategic-consulting/)
- [Cybersecurity](https://teamascend.com/services/cybersecurity/)
- [IT Infrastructure](https://teamascend.com/services/infrastructure/)
- [Cloud](https://teamascend.com/services/cloud-computing/)
- [24/7 Support Desk](https://teamascend.com/services/infrastructure/support-desk/)
- [Microsoft Services](https://teamascend.com/services/microsoft-365/)
- [Salesforce Services](https://teamascend.com/salesforce-services/)
- [HubSpot Services](https://teamascend.com/services/hubspot-services/)
- [App Development](https://teamascend.com/services/application-development/)
### Empowering Technology. Powered by People.
Technology is critical to businesses across all industries. Today's technology must be smart, reliable, adaptable, and secure. At Ascend Technologies, we deliver solutions at the highest level, from cloud computing to proactive cybersecurity strategies to Salesforce excellence. And the team? As impressive as the tech. Our practical support is focused on one thing: your success. Let's see what we can do together.
[Contact Us](https://teamascend.com/contact/)
©2026 Ascend Technologies, LLC, All Rights Reserved | [Privacy Policy](https://teamascend.com/privacy-policy/)
```json
{
"@context" : "https://schema.org",
"@type" : "WebPage",
"breadcrumb" : {
"@type" : "BreadcrumbList",
"itemListElement" : [ {
"@type" : "ListItem",
"item" : "https://blog.teamascend.com",
"name" : "Home",
"position" : 1
} ]
},
"dateModified" : "2026-07-22T13🇲🇲49",
"description" : "How do you create branded emails in Salesforce? This guide covers Enhanced Letterheads, Flow-generated email branding, and HTML signature setup for admins.",
"name" : "How to Create a Branded Email Experience in Salesforce",
"primaryImageOfPage" : {
"@type" : "ImageObject",
"url" : "https://content.teamascend.com/hubfs/AdobeStock_1912479380.jpeg"
},
"publisher" : {
"@type" : "Organization",
"logo" : {
"@type" : "ImageObject",
"url" : "https://content.teamascend.com/hubfs/Ascend-Technologies-HubSpot-Logo.png"
},
"name" : "Ascend Technologies",
"url" : "https://blog.teamascend.com"
},
"url" : "https://blog.teamascend.com/blog/how-to-create-a-branded-email-experience-in-salesforce"
}
``` |